
This tutorial presents how Beebotte can be used to build an interactive poll application.
This tutorial assumes that you have successfully registered to Beebotte and obtained your API and Secret keys.
Tutorial contents:
At the end of this tutorial, you will be able to create an interactive real-time poll application in ASP.Net:
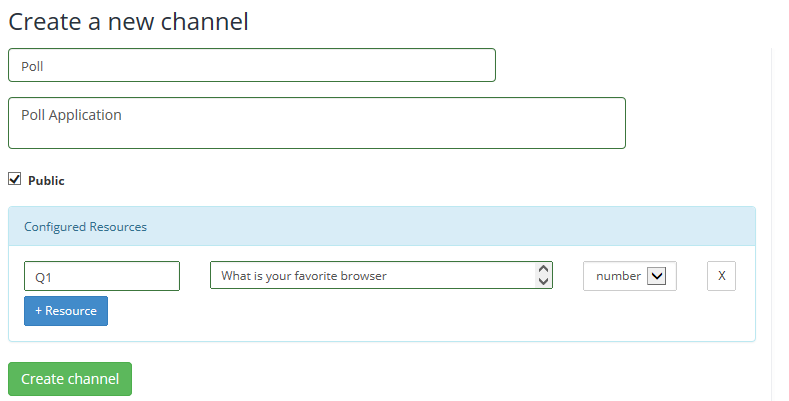
In this Poll application, we will use Beebotte to save users votes. We assume here that our poll has one question. For this reason we need to create a public Channel with one resource of type number indicating the selected answer's index.
In your account home page, click on Create New and follow the instructions to create your channel.
In this tutorial we will create an empty ASP.Net web application with a core reference to Web API. ASP.NET Web API is an ideal platform for building RESTful applications on the .NET Framework. In this tutorial, we will use the Web API to create an authentication end point to authenticate our client requests against Beebotte.
Start Visual Studio and select New Project from the Start page. Or, from the File menu, select New and then Project.
In the Templates pane, select Installed Templates and expand the Visual C# node. Under Visual C#, select Web. In the list of project templates, select ASP.NET Web Application. Name the project and click OK.
In the New ASP.NET Project dialog, select the Empty template. Under Add folders and core references for, check Web API and click OK.
From the Solution Explorer, right-click on the project and click Manage Nuget Packages.
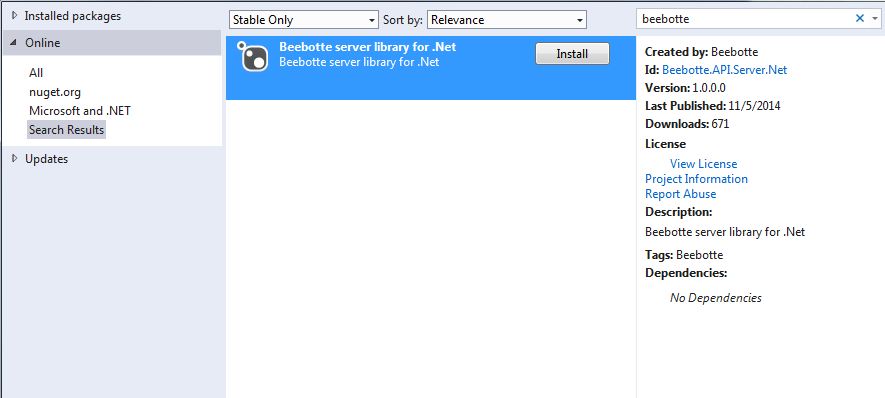
In the Manage Nuget Packages dialog, in the search box, type Beebotte and hit Enter, select Beebotte server library for .Net and click Install.
Repeat the same steps to add reference to Bootstrap in order to give your application responsive and nice UI design; type Bootstrap in the search box and hit Enter, select Bootstrap and click Install. Click Close.
Now, we will create our restful authentication end-point that will be used to authenticate client requests against Beebotte.
A model is an object that represents the data in your application. ASP.NET Web API can automatically serialize your model to JSON, XML, or some other format, and then write the serialized data into the body of the HTTP response message.
If Solution Explorer is not already visible, click the View menu and select Solution Explorer. In Solution Explorer, right-click the Models folder. From the context menu, select Add then select Class.
Name the class Authentication and add the following property to it.
public class Authentication
  {
    public string auth { get; set; }
}In Web API, a controller is an object that handles HTTP requests. We'll add a controller that returns an authentication object.
In Solution Explorer, right-click the Controllers folder. Select Add and then select Controller.
In the Add Scaffold dialog, select Web API 2 Controller - Empty and click Add.
In the Add Controller dialog, name the controller AuthenticationsController and click Add.
The scaffolding creates a file named AuthenticationsController.cs in the Controllers folder.
If this file is not open already, double-click the file to open it. Replace the code in this file with the following while replacing API Key and Secret Key with those of your account.
using System;
using System.Collections.Generic;
using System.Collections.Specialized;
using System.Linq;
using System.Net;
using System.Net.Http;
using System.Web;
using System.Web.Http;
using Beebotte.API.Server.Net;
using Poll_Demo.Models;

namespace Poll_Demo.Controllers
{
    public class AuthenticationsController : ApiController
    {
        public IHttpActionResult GetAuthentication(string id)
        {
            NameValueCollection requestParams = HttpUtility.ParseQueryString(Request.RequestUri.Query);
            var authentication = new Authentication();

            //TODO: Replace API_Key and Secret_Key with those of your account
            string apiKey = "API_Key";
            string secretKey = "Secret_Key";
            string signature = String.Empty;
            var channel = requestParams["channel"];
            var resource = requestParams["resource"];
            var read = requestParams["read"];
            var write = requestParams["write"];
            var sid = requestParams["sid"];
            string userid = requestParams["userid"];
            var toSign = String.IsNullOrEmpty(userid) ? String.Format("{0}:{1}.{2}:ttl={3}:read={4}:write={5}", sid, channel, resource, "0", read, write) :
            String.Format("{0}:{1}.{2}:ttl={3}:read={4}:write={5}:userid={6}",
            sid, channel, resource, "0", read,
            write, userid);
            signature = String.Format("{0}:{1}", apiKey, Utilities.GenerateHMACHash(toSign, secretKey));
            authentication.auth = signature;
            return Ok(authentication);
        }
    }
}In Solution Explorer, right-click the project. Select Add and then select Web Form. Name the Web Form Default.aspx.
Open your web form in Source view and add the following to the Head section:
<script src="http://code.jquery.com/jquery-1.9.1.js"></script>
<link href="Content/bootstrap.css" rel="stylesheet" />
<script src="Scripts/bootstrap.js"></script>
<script src="http://d2imkaiqu95sh.cloudfront.net/assets/js/socket.io-1.1.0.js"></script>
<script src="http://beebotte.com/bbt.js"></script>
In this tutorial, we will add a poll with one question and 4 answers. We will display the answers with a radio buttons list.
Add the following to the body of your web page:
<div class="container">
    <div class="page-header" >
       <h1>Beebotte Poll Demo <br />
           <small>with real-time results update</small>

       </h1>
    </div>
    <div class="row">
        <div class="col-md-6">
            <div class="panel panel-primary">
                <div class="panel-heading">
                    <h3 class="panel-title">
                        <span class="glyphicon glyphicon-arrow-right"></span>  What is your favorite browser
                    </h3>
                </div>
                <ul class="list-group">
                    <li class="list-group-item">
                        <div class="radio">
                            <label>
                                <input value="1" type="radio" name="optionsRadios"/>
                                FireFox
                            </label> (<span id="option1Perc" >0</span>)
                        </div>
                        <div class="progress">
                          <div id="option1bar" class="progress-bar" role="progressbar" aria-valuemin="0" aria-valuemax="100" style="width: 0%;">
                            0%
                          </div>
                        </div>
                    </li>
                    <li class="list-group-item">
                        <div class="radio">
                            <label>
                                <input value="2" type="radio" name="optionsRadios"/>
                                Chrome
                            </label> (<span id="option2Perc" >0</span>)
                        </div>
                        <div class="progress">
                          <div id="option2bar" class="progress-bar" role="progressbar" aria-valuemin="0" aria-valuemax="100" style="width: 0%;">
                            0%
                          </div>
                        </div>
                    </li>
                    <li class="list-group-item">
                        <div class="radio">
                            <label>
                                <input value="3" type="radio" name="optionsRadios"/>
                                Internet Explorer
                            </label> (<span id="option3Perc" >0</span>)
                        </div>
                        <div class="progress">
                          <div id="option3bar" class="progress-bar" role="progressbar" aria-valuemin="0" aria-valuemax="100" style="width: 0%;">
                            0%
                          </div>
                        </div>
                    </li>
                    <li class="list-group-item">
                        <div class="radio">
                            <label>
                                <input  value="4" type="radio" name="optionsRadios"/>
                                Safari
                            </label> (<span id="option4Perc" >0</span>)
                        </div>
                        <div class="progress">
                          <div id="option4bar" class="progress-bar" role="progressbar" aria-valuemin="0" aria-valuemax="100" style="width: 0%;">
                            0%
                          </div>
                        </div>
                    </li>
                </ul>
                <div class="panel-footer">
                    <button type="button" class="btn btn-primary" onclick="vote()">
                        Vote</button>
                </div>
            </div>
        </div>
    </div>
</div>We will use $(document).ready event to load the results of our poll and to subscribe to our Beebotte channel in order to be notified whenever a new answer is submitted.
Add the following script to your web form and replace API_KEY with that of your account:
var bbt;
var optionsTotal = [0, 0, 0, 0];
$(document).ready(function () {
    bbt = new BBT('API_KEY', { ws_host: 'beebotte.com', auth_endpoint: '/api/authentications/bbt' });
    bbt.subscribe({ channel: 'Poll', resource: 'Q1', read: true, write: true }, function (message) {
        optionsTotal[message.data -1] += 1;
        updateResults();
    });
    GetResults();
});

function GetResults() {
    bbt.read({ owner: 'beebotte', channel: 'Poll', resource: ' Q1', limit: 10000 }, function (err, msg) {
        $(jQuery.parseJSON(JSON.stringify(msg))).each(function () {
            optionsTotal[this.data - 1] += 1;
        });
        updateResults();
    });
}

function updateResults() {
    var total = 0;
    $(optionsTotal).each(function () {
        total += this;
    });
    if (total > 0) {
        $("#option1Perc").html(optionsTotal[0] + " votes");
        $("#option2Perc").html(optionsTotal[1] + " votes");
        $("#option3Perc").html(optionsTotal[2] + " votes");
        $("#option4Perc").html(optionsTotal[3] + " votes");

        $("#option1bar").html((optionsTotal[0] * 100 / total).toFixed(2) + "%");
        $("#option2bar").html((optionsTotal[1] * 100 / total).toFixed(2) + "%");
        $("#option3bar").html((optionsTotal[2] * 100 / total).toFixed(2) + "%");
        $("#option4bar").html((optionsTotal[3] * 100 / total).toFixed(2) + "%");

        $("#option1bar").width((optionsTotal[0] * 100 / total).toFixed(2) + "%");
        $("#option2bar").width((optionsTotal[1] * 100 / total).toFixed(2) + "%");
        $("#option3bar").width((optionsTotal[2] * 100 / total).toFixed(2) + "%");
        $("#option4bar").width((optionsTotal[3] * 100 / total).toFixed(2) + "%");
    }
}Add the following JavaScript function to your web form. This function will be called when a user clicks on the Vote button, to submit his/her answer to Beebotte.
function vote()
{
    var selected = $("input:radio[name='optionsRadios']:checked").val();
    if (selected !== undefined) {
        bbt.write({ channel: 'Poll', resource: 'Q1' }, parseInt(selected));
    }
}
In this tutorial we learned how Beebotte can be used to build an interactive poll application. You can fork the code on Github to enhance the application by: